If you are needing some help structuring or writing your scientific manuscript, you’ve come to the right place!
Here we have gathered all of our best tips, formulas, and advice for putting your manuscript together.
Don’t forget to bookmark this page and check back often – it is constantly updated with our new content!
Scroll down to start at the beginning with how to structure a manuscript, or
Skip to where you are struggling!
Getting started writing a scientific manuscript
Basic structure of scientific manuscript
When starting to write a scientific manuscript, its a good idea to have a basic knowledge of the structure you are going to use. If you are writing for a science or engineering journal, your paper will likely follow the IMRAD structure, which is the basic paper format we teach here.
An IMRAD-based paper includes:
Title
Abstract
Introduction
Methods
Results
and
Discussion
Get all of this on video here:
More detailed structure of a manuscript - the SCOPE
BUT – if you are on this page, you might be realizing that it is incredibly difficult to write those headings on a blank document and start filling in text.
So, how do you do that?
Well, the first step is realizing that starting from the beginning is one of the hardest ways to start writing.
Why?
Because the beginning of your manuscript is the point of the text that is the FURTHEST AWAY from the parts you are the most comfortable with. It is the part of the manuscript that is the BROADEST in SCOPE, which makes it the most difficult to write.
So now, what is this scope?
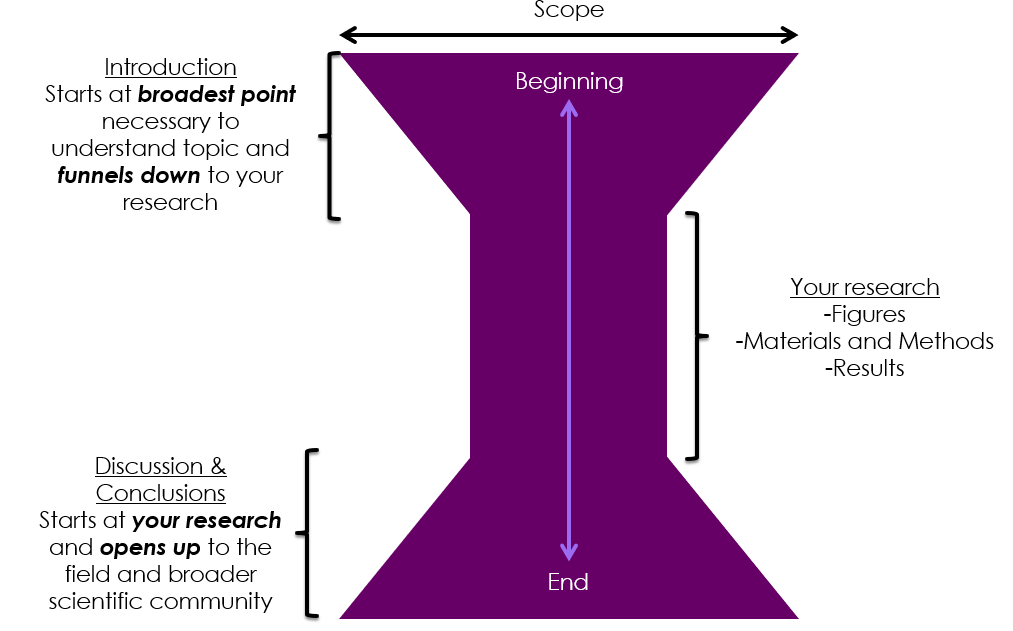
The hourglass diagram below illustrates the SCOPE of your manuscript. From top to bottom, the diagram shows your paper from beginning to end. Then, from left to right, the diagram shows how wide the scope of your paper is at each point.
From here, you can see that the introduction starts at the broadest possible scope and slowly narrows this scope to prepare the reader for your research.
The middle part of the hourglass has the narrowest scope, and this is the part that contains all of the work you did. This is your figures, methods, and results sections.
The final part of the hourglass is then the reverse of the introduction – it starts at a narrow scope and widens back out to the field at large. This brings the reader from your very narrow slice of research and relates it to the field as a whole and to society at large.
–>To really learn about the structure of a scientific manuscript, you can check out this post that covers it in detail!
Most efficient order for writing a scientific manuscript
With this diagram, it should become more obvious why the beginning of the paper would be harder to write – it has a very broad scope and consists of a lot of information that you rarely think about in the course of your work.
Instead, your main, day-to-day focus is part of this diagram that is the narrowest in scope.
And guess what?
That means that the easiest parts to write are the ones that are the narrowest in scope!
Therefore, my recommended writing order is:
- Figures
- Methods
- Results
- Discussion
- Introduction
- Abstract
- Title
If you are stuck, and want to learn how to get words on paper when writing a scientific manuscript:
For more information on what goes in each section, keep reading!
Writing a scientific manuscript by section
Here we’ve collated our best tips and advice for assembling each section of your manuscript, listed in our recommended writing order. This should help you get right to the point at each stage in writing a scientific manuscript.
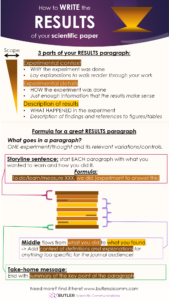
Results
As the figures set up the story you are going to tell and the order in which you are going to tell it, the results should be written after the figures of the paper are basically set.
For me, it is also much easier to write the results either after or at the same time as the methods. As I start writing a method, I start thinking about what I saw in that assay or experiment. This helps me flow/transition into writing up those results.
PRO-TIP: Especially if you feel stuck when writing the results, make sure your figures are completed and try writing your methods first!
Because the scope at the results is so narrow – it is the narrowest of your paper – it is important to remember your reader here. For that reason, try ensuring you include enough context clues that your reader can easily follow along with what you did.
By including context clues in your writing, you can ensure that your paper is understandable and therefore ACCESSIBLE to a broader audience than just specialists in your field.
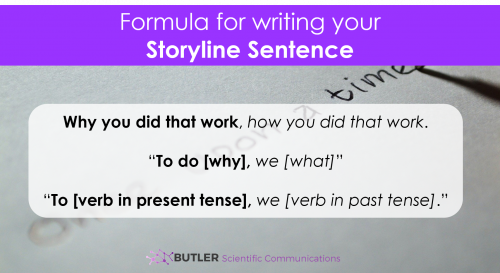
You also want your manuscript to tell a compelling story that will draw your reader in and keep them reading. Unfortunately, most readers usually skim read articles, as no one has the time to read everything from top to bottom. To keep a reader interested even when skimming, make sure to include storyline sentences in your work that ensure the key information is right where the reader is going to look for it.
Discussion:
Even though the discussion of the paper might seem daunting before you’ve started writing a scientific manuscript, after the results are written it becomes much easier. This is especially true if you remember that the discussion section starts at the narrow scope of your results and build out to the audience.
This means you don’t have to START at a road scope when writing the discussion – you can start at a narrow scope and build up to it!
In fact, the first main part of the discussion section is just a recap of what you found in the paper, and the rest of the discussion builds on that.
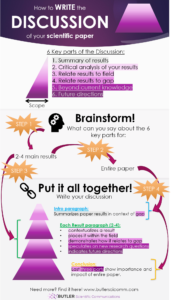
Overall, there are 6 key parts to an effective discussion.
These parts are:
1. Summary of results
- Reminds the reader of key results of your work
2. Critical analysis of your results
- Interprets the significance of your results for the reader
- Includes highlighting all trends, relationships and new knowledge
3. Relate results to field
- Shows how your results fit into the field as a whole
- This is where you relate to previous work and include references
4. Relate results to gap
- Shows how your results relate to the gap in the field, i.e., edge of current knowledge
5. Beyond current knowledge
- Speculation about how the field has changed or new hypotheses that can be made
6. Future directions
- Future studies that can address new hypotheses or limitations to your current study
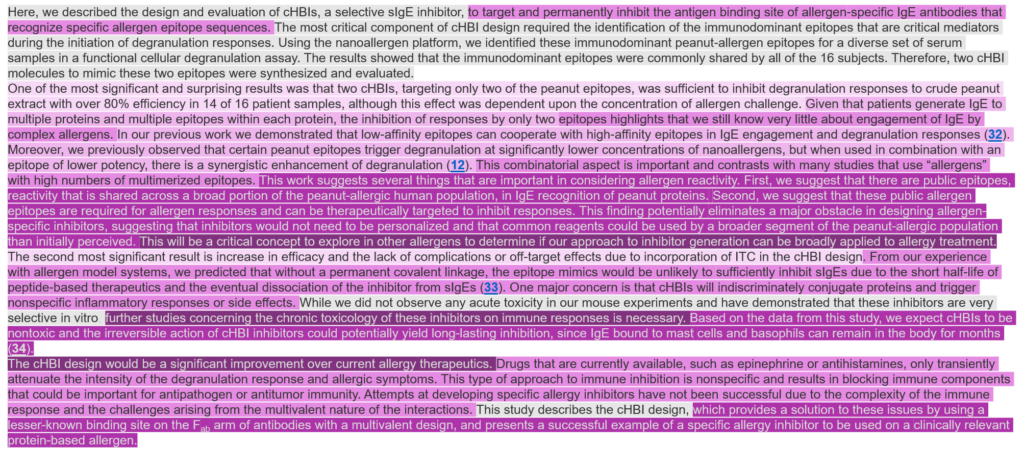
If you want to see how all of these parts of a discussion work together, you can follow this detailed and color-coded breakdown of a discussion section. It walks through a breakdown of the discussion in Deak et al., PNAS (2019), 116 (18) 8966-8974; DOI:10.1073/pnas.1820417116, and is color-coded based on the key part of the discussion found at each part.
You can see there is a definite trend in the discussion section, and once you are comfortable with how the information is divided the section becomes much more manageable to write.
Conclusion (also last paragraph of discussion)
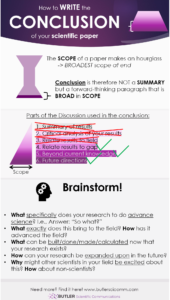
In some journals, the conclusion is the last paragraph of the discussion section. Many journals, though, do not have a separate conclusion section, so it becomes the final paragraph of the discussion.
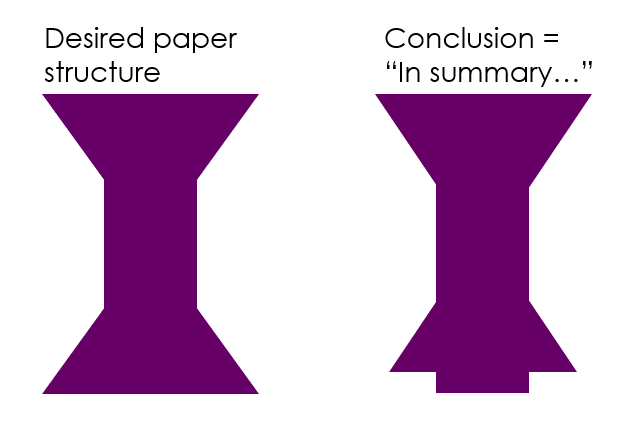
If you go through the detailed discussion breakdown linked above, you will definitely understand the BIGGEST CONCLUSION MISTAKE I usually see in writing a scientific manuscript: making the conclusion a summary of the paper instead of a forward-thinking paragraph that highlights the importance and impact of the work.
Based on the hourglass diagram, the conclusion, which is the final paragraph, should have some of the widest scope of the entire paper.
By narrowing this scope back to a summary of the paper, it abruptly stops all of the thoughts the reader was having about your work as you integrated what you did with the field and the rests of science. This can be detrimental to the reader’s understanding of the impact and importance of your paper.
Introduction:
Struggling with the introduction is common, so if you are, don’t worry – you are not alone! I have an entire post here about the basics you need to write your introduction.
Or, if video is more your jam, you can also find this information on YouTube!
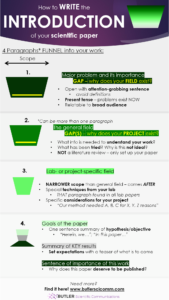
Structure your intro like a funnel
A major reason for this is it’s structure – remember the scope diagram? The introduction needs to start at the broadest scope and narrow to your research. Unfortunately, in trying to do that, it is very easy for your focus to become sidetracked.
To better do this, try to set up your introduction using four key paragraphs:
1. The major problem and why it is important
- Relates to the reader to attract their attention and shows them why this work matters.
- Gap = why your field exists
2. The field
- Provides a clear sense of what has been tried and current drawbacks of the previous work
- Gap = why your paper exists
3. Your previous work and special considerations
- Explain your previous research and any specialized techniques used by the lab
- The paragraph that is frequently similar between all lab papers
- Provides a checklist of needs or special considerations for work you will do
4. Hypothesis and major objectives
- Exactly what you sought to accomplish, how you were going to do it, and briefly the importance of the results
Clearly state the GAP!
Note that I keep mentioning the gap…so about that.
Has anyone ever said that they couldn’t see the importance of your research?
In my experience, this almost always means that you are lacking clear statements of the gap.
What does this mean?
Most scientists are fine with presenting paragraphs indicating the previous work in the field, but many fail to include one important point – a very clear statement of exactly where there is still a gap to be filled.
To best indicate the importance of your work, make sure you include these statements of clear gaps when writing your introduction. You reader will not understand this intuitively from the overview of the field, so make sure it is clear and exactly stated in EVERY paragraph of your introduction.
This one simple step will instantly transform your paper in terms of conveying the importance.
Abstract
The abstract is another section that is usually very difficult to write. It is a very short overview of your work, but needs to pack a big punch!
Luckily, I wrote a quick Guide to Abstracts that you can check out for tons of details on how to do this. Don’t worry, its completely free!
Want even more detailed help?
Because abstracts are the hardest part of a paper for most, we took the abstract module of our online course and made it available as a COMPLETELY FREE EMAIL COURSE.
This 5-day email course will walk you through:
- A detailed breakdown of an ideal abstract (Day 1)
- The biggest mistakes I see in abstracts (Day 2)
- How to analyze and edit your draft (Day 3)
- How to write your abstract from scratch (Day 4)
- The Do’s, Don’ts, and how to get “unstuck” if you just can’t get words on paper (Day 5)
- My exact formulas for abstract writing that have been tested on hundreds of students
6 Key parts of an abstract
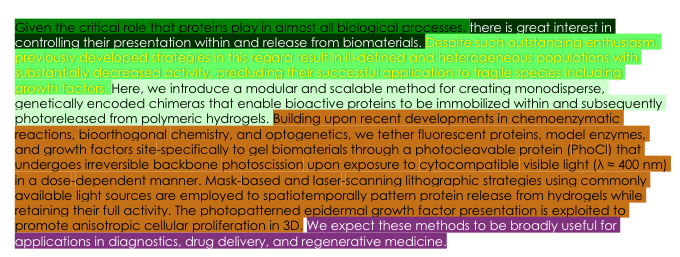
In short, there are 6 key sections of an abstract that you should focus on:
1. Overall, relatable problem
- General problem in society that your reader can relate to.
2. Why should the reader care?
- The problem isn’t important without a clear statement of why!
- Make the relevance impossible to miss!
3. Relate results to field
- What has been done?
- Provide just enough detail on the field to get to a gap. Usually ~1 sentence.
4. What did this manuscript try to do? (hypothesis)
- Explicit statement of the purpose of this work
- “Herein, we sought to…”
5. What were the major findings?
- Brief (2-5 sentence) summary of your key findings.
6. What is the significance?
- *Most often skipped section, but one of the most important!
- 1/2 – 1 sentence summary of the importance – highlight why this work deserves to be published!
Quick guide to composing an abstract (~250 words):
- Overall problem in general field (1 sentence)
- Why should the reader care? (1 sentence)
- What has been done? (1-2 sentences)
- What did this paper try to do (hypothesis)? (1 sentence)
- What were the major findings? (2-3 sentences)
- What is the major significance? (1 sentence)
Breakdown of an ideal abstract
You can also find a breakdown of an ideal scientific abstract here.
Still want a bit more help?
Don’t forget our complementary 5-day email course on everything you need to know to write and edit a great abstract:
Title
The title is an often overlooked beast with papers…you need to pack an even bigger punch in fewer words than with the abstract!
And, no pressure, but way more people are going to read the title of your paper than are ever going to read your abstract or your paper body.
So how do you attract readers to your paper using your title?
Briefly summarized from this article on the three key parts of a title, here is what you should try to include:
1. Keywords
- The major keywords that describe your paper or that your reader will use to search for your paper.
2. Emphasis
- The problem isn’t important without a clear statement of why!
- Make the relevance impossible to miss!
3. Impact
- What has been done?
- Provide just enough detail on the field to get to a gap. Usually ~1 sentence.
Need more help writing a scientific manuscript?
If you want a professional editor to help you write your scientific manuscript or look over your document, you can check out our editing services here.
You can also sign up for a live workshop (in person or online) that will teach you exactly how to write your scientific manuscript from scratch. This workshop covers all of our best information, so be sure not to miss it!
Also, we are constantly updating this guide to writing a scientific manuscript with new posts from our blog, so bookmark this page for new info!
